The history of posts on the Ribbon can be found at the Ribbon Example Table of Contents.
For this installment, I thought I would focus on exploring the button control in depth, explaining what each piece of XML does when building the ribbon control, and what types of values are permitted for each one. In a follow-up article, we'll discuss how to make these controls dynamic, but for now we'll just focus on a very static button in a custom group.
Beginning With Static Items
Whenever we are programming, it is helpful to understand what pieces of code are assigned to what properties of the object. The following is a list of all of the components that we can set for a button, and where they show up:
Base XML Markup
The framework for the XML Markup is fairly static, although we'll explore some minor modifications to it in the next section. For most purposes, however, it starts with a declaration of the schema, opening your Ribbon object, referring to (or creating) a tab, and referring to (or creating) a group. Within the group tag is where we will place all of our button (or other) controls. The XML below creates a new tab called "XLG" after the "View" tab, adds a group called "My Testing Tab" and puts the button there.
Rather than explain all the XML at this point, be aware that the code to create any control within the group should be surrounded by the open and close tags: "<" and "/>"
For our purposes, I have constructed the base XML we'll use, which should be added to an Excel file by using the CustomUI editor. I would suggest creating, saving and closing a new file for this (make it an xlsm file). Once done, open it in the CustomUI editor and paste in the following XML:
[xml]


[/xml]
The above code will be used for all demonstrations in this article. Once saved, the following group will show on the XLG ribbon tab:

Reviewing the Button Code and Properties
We're going to begin our dissection by looking at the line that begins with the "button id" portion of the XML.
Remember! All of the XML markup is case sensitive!
"id" Tags
You must have an ID tag associated with your control, as this is how the application keeps track of what controls have what properties. You won't see this on the ribbon, as it is a "behind the scenes" feature.
You may use any one of the following for your ID:
- id
- The XML form is id="name of id"
- The name of the id must be unique for each id added
- Allows creation of custom buttons and controls
- idMso
- The XML form is idMso="id of control"
- The name of the id must match a valid office control name
- Allows "repurposing" of a control (replacing aspects of an existing control with your own intentions
- idQ
- The XML form is idQ="id of control"
- Used for working within defined namespaces (and is out of the context of this article.)
For the purposes of this article, I have used the "id" tag, and assigned it an id of "button1": id="button1"
The "description" Tag
The description tag is not publicly shown on the ribbon, and is an optional control with no default value. In our case, I assigned a value to this property with the following piece of XML: description="my custom description"
The "enabled" Tag
The enabled tag specifies if the control is active or not. It is specified with the following XML: enabled="true"
A control specified with enabled = "false" will not trigger anything when clicked, and will be grayed out, as shown below:

This property is optional, and will revert to a default value of "true" if not specified.
"image" Tags
When inserting images, you have the choice of specifying one of the following:
- image
- The XML form is image="my image name"
- The image tag allows you to refer to your own images that have been included in the file package
- imageMso
- The XML form is imageMso="MS Office image id"
- The imageMSO tag allows you to specify Microsoft Office images to be used on the ribbon
- To get the image id, go into Office|Excel Options|Customize, and let your mouse hover over the names in the list. At the end you'll see the id within brackets, as shown below:
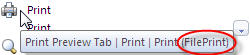
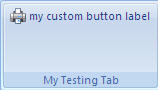
For the purposes of this example, I've specified to use the built in Printer icon, by supplying the following XML: imageMso="FilePrint"
The image tag is completely optional, and will not show an image if you ignore it. If you omitted any type of image tag, (leaving the rest of our XML as is,) you would end up with a button like this:

The "label" Tag
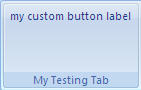
The Label tag is used to assign a caption to a button, and is an optional tag. If you leave it blank, you will see no caption with your button at all. In our case, I assigned a value to this property with the following piece of XML: label="my custom button label"
This piece of XML manifests itself on the ribbon as shown below:

The "keytip" Tag
The Keytip tag's purpose is to allow you to access your ribbon control via keystrokes. If you read the XML carefully, you'll see that I've assigned a keytip of "x" to the XLG tab, and the following portion assigns a keytip to the actual button: keytip="zcb".
If you press Alt+x, you'll see the keytip show up on the button as follows:

According to the FAQ's in Microsoft's Customizing the Office (2007) Ribbon User Interface for Developers (Part 3 of 3) article, they suggest that you start all keytips with the "Z" character. In my experience, however, leading with an uppercase Z, (followed by whatever characters,) will yield you a keytip of "Y".
The "onAction" Tag
onAction is the property that specifies what code routine is run when the button is clicked. You will need to program the appropriate code for the routine yourself, and specify the name of that routine here. As there are examples of how to deal with this aspect on this blog, I will not cover it in much more detail at this point, except to say that the routine I have chosen for the example is called "rbnButton_Click", and is specified with the XML of onAction="rbnButton_Click".
It should be noted that you can designate a single routine as a central handler for all of your buttons, and take appropriate action by testing the id, or you can program a separate routine for each individual button. One thing that should not be done, however, is to try and handle controls of different types through a single onAction handler. Many controls require slightly different signatures, so they could fail if you try to go that route.
The signature for a button's onAction control in VBA is as follows:
[vb]Private Sub rbnButton_Click(control As IRibbonControl)

'Code here

End Sub[/vb]
I would also suggest that it is a "Best Practice" to ensure that all onAction routines are specified as Private, and placed in a standard module.
The "showImage" Tag
This tag makes the image visible or hidden, and is specified as follows: showImage="true".
The showImage tag can accept values of "true" or "false" only, and will default to true if not specified.
Interestingly, and I'm not sure if this is a bug or not, my tests show that this setting only seems to apply to a button if the size is set to "normal". I.e. "Large" images will show even if the setting is specified as false. What it should look like is as follows:
The picture above was generated by not specifying an image or imageMso tag at all. So if you really want a large picture-less button, it looks like that is the only route for now.
For reference, the showImage tag does work correctly with a "normal" sized button, and the picture below illustrates that:
The "showLabel" Tag
This tag shows or hides the button label, and uses the following XML to do so: showLabel="true"
ShowLabel is an optional tag as well, with a default value of true.
Strangely, this tag shows the same idiosyncrasies as the showImage tag above. Specifying false in our XML should yield the button below, but for some reason this picture had to be generated by removing the label="my custom button label" code from the XML.

Again, for demonstration, the following would display (correctly) when setting the showLabel tag to "false" and the size to "normal":

The "size" Tag
The purpose of this tag is easy to guess... it sets the size of the button image. In the examples above we've been using a large button, which was declared with the following XML: size="large"
The size tag is optional, and can accept values of either "normal" (small), or "large". If it is not specified, it will default to "normal"
A picture of our button using a size of "normal" is shown below:
The "screentip" tag
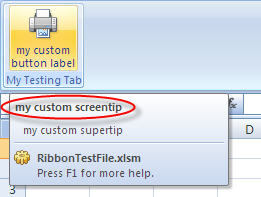
This tag allows you to set a screentip for your button by specifying the following XML: screentip="my custom screentip"
Again, this is an optional tag that will leave the field blank if not specified. A picture showing where this information is displayed is shown here:
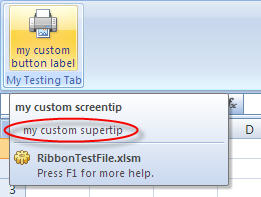
The "supertip" tag
This tag allows you to set a supertip (similar to a screentip) for your button by specifying the following XML: supertip="my custom supertip"
Again, this is an optional tag that will leave the field blank if not specified. The following picture shows where the supertip information is displayed:
The "visible" tag
This tag sets the visibility of a button, and is specified as follows: visible="true"
It is an optional tag which can accept the values of "true" or "false", and will default to true if not specified.
As you might expect, setting the value of your control to false will hide it completely, as shown below:

Conclusion
I hope that this has helped to explain the components of a RibbonX button and the code used to create it. I'm also hoping that the pictures to show the effects of changes were useful to display exactly what effect modifying pieces of the XML would do to the overall output.
While it is necessary to understand the basic construction of a static button, it is unlikely that most people will have their needs met by one. To that end, there will be a follow-up post to this, explaining how to make these pieces dynamic, allowing us to change them on the fly.
🙂
12 thoughts on “Modifying the Ribbon – Part 11”
An answer on the issues I'd raised on the showImage and showLabel tags related to large buttons. I had the chance to participate in a conference call with Microsoft last week, and was able to mention the issue of these tags being ignored when set to false with large buttons.
Apparently, this was actually intentional... go figure that. (It wasn't the right forum to ask why, so that's the best I can do for you right now.)
So if you do want to mimic showImage="false" or showLabel="false" on a large button, you'll need to use the workarounds that I discussed above.
🙂
Hi Ken,
I was wondering if it is possible to hide or modify the lower section of the screen tip, the one under the horizontal line, with a "gear" icon and the name of the workbook? Showing the name of the underlying workbook does NOT make our Excel App look polished.
Thanks,
Neil
Hi Neil,
Unfortunately, no. We can't touch the workbook name, the gear, or even remove the F1 for help line. Quite irritating, that. 🙁
Is it possible to set focus on the tab from within the code?
Thanks
Hi Alex,
You've only really got two options. You can insert your tab before the home tab, which will activate it when the workbook opens (most of the time). The other option you have it using SendKeys to send the keystrokes to the application to activate the tabs.
It would be nice if we could activate the tabs via the object model, but no so luck yet.
Hi Ken,
SendKeys worked like a charm for me, thanks!!!!
I do have another question, maybe you have some idea on how to implement it. I am looking for a way to associate Ribbon icons (Office icons) with Command Buttons. Do you know how to do that?
Thanks
Alex
Hi Alex,
I'm not sure I quite follow... are you asking to use RibbonX images on ActiveX command buttons, Forms toolbox buttons, or as CommandBarButtons in earlier versions of Excel?
Sorry for confusing the subject, I am asking for CommandButton control in MS Access. I'd like to use the images that are in the RibbonX library for a button on a Access form.
Hi Alex,
Honestly, I'd probably do this by taking a screen shot of the image using SnagIt (or some other capture software), save it to my hard drive, then link the picture by using the browse button.
I'm certainly not saying that it couldn't be done via code, but I've never taken the time to try and do it for an Access button. You could look at the userform on this post to see how it is all linked up though: https://excelguru.ca/2007/05/05/identifying-your-imagemso-excel-word-powerpoint/ It may work into an answer for you. 🙂
Great article and very helpful.
I am wondering how to add a newline to the 'supertip' in order to break up the tip into a more easily read tip?
In addition to the newlines, some of the built-in supertips include the use of images, I am wondering how this is achieved?
Pingback: Ribbon button - showLabel attribute ignored
Thanks a lot for this guide!