I ran into an interesting wrinkle in a model I’m building, where I need to allocate units based on dates. The idea here is to allow a user to the number of units to allocate, the start date and the end date. From there, I wanted to use Power Query to work out how many months have elapsed, and then tell me how many units should be allocated to each year in the period.
Background:
Here’s a look at my data (which you can download here):

So the idea here is that I need to come up with a table that shows that data should be allocated as follows:
So, if we look at the Traditional Single Family, the sales cycle is the 6 months from Aug 2015 through Jan 2016. With the first 5 months being in 2015 and the final month being in 2016, that means we need to allocate 5/6 of the total units to 2015 and 1/6 to 2016.
Allocate Units Based on Date: Method
My initial thought was to try and find a date difference or duration type function to return a count of months between two dates. Unfortunately, such a function doesn’t seem to exist. For that reason, I decided I’d just go ahead and build my own function to do the job.
Step 1: Create a function to return a list of months
To start with, I needed a list of month end dates. I started a blank query, jumped into the Advanced Editor and built a simple query to provide a hard coded startdate and enddate, then create a list from one to the other:
let
startdate=#date(2015,8,1),
enddate=#date(2016,1,31),
Source = {Number.From(startdate)..Number.From(enddate)}
in
Source
That list yielded me a list of date serial numbers, so I then:
- Went to Transform –> To Table
- Changed the column’s data type to Date
- Renamed the column to Date
- Converted the column to month end dates (Transform –> Date –> Month End)
- Removed Duplicates (Home –> Remove Duplicates)
The end result is a short table that shows only the month end dates:

Step 2: Add a Year End date column
I then needed to find a way to count the number of months in each year. To do that I:
- Added a year end column (Select the Date column –> Add Column –> Date –> Year –> End of Year)
- Went to Transform –> Group By and set up the grouping as follows:
- Group by: EndOfYear
- New column name: Months_x_Year
- Operation: CountRows

Step 3: Modify to list Months in Period
At this point I realized that I had a pretty serious miss in my logic. If I wanted to apply this as a proportion, I needed to also track the total amount of months in the period (so that I could allocate 5/6 to 2015 and 1/6 to 2016.)
To fix this, I added another level of grouping, but with a twist…
- I removed the “Group By” column
- I created an “Original” column, and set the operation to All Rows
- I created a “Months_Total” column, set to SUM the Months_x_Year column
Here’s the configuration:

And the result:

This is pretty slick, as the grouping returned the total count of months, but also returned the original table. Of course, when you expand the table using the double headed arrow to the top right of the Original column, it runs the Months_Total row down each row that gets added:

Step 4: Turn the routine into a function
The next step was to go back into the Advanced Editor, and turn this into a function. That’s actually not hard at all, requiring only three lines to be modified. The first 4 lines of the function are shown here:
(startdate as date, enddate as date) as table =>
let
//startdate=#date(2015,8,1),
//enddate=#date(2016,1,31),
As you can see, I basically added the parameter line at the beginning (using the same variable names for startdate and enddate), then commented out the lines I initially used in order to populate the data I used to build my test case.
Finally, I renamed the function to fnGetAllocationBase, and saved it.
Step 5: Using the function
To use the function, we basically now just load the original table, then feed the start/end dates in to it. Here’s how I went through that process:
- Select the table –> Power Query –> From Table
- Select the First Month and Last Month columns –> Change Type –> Date
- Add Column –> Add Custom Column
- Formula: =fnGetAllocationBase([First Month],[Last Month])
I now had a new column containing the tables I needed with my allocation basis:

As I didn’t need month granularity for my model, (we’re budgeting on an annual basis,) I’m now able to:
- Remove the First Month and Last Month columns
- Expand the columns from the Custom column
- Add a new custom column with the following details:
- Name: Units
- Formula: =[Units To Allocate]*[Months_x_Year]/[Months_Total]
- Remove the Units to Allocate, Months_x_Year and Months_Total columns
- Set my data types
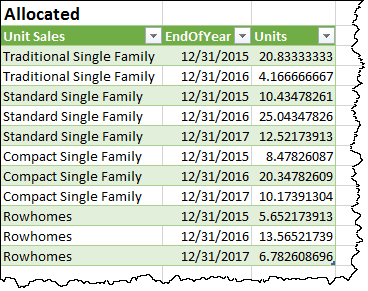
And the end result is a nice table that will serve my sales model nicely:

3 thoughts on “Allocate Units Based on Dates Using Power Query”
That's really smart! Step 3 is my favourite 🙂
Thanks for sharing!
What's really cool about this one is that I learned that in our http://powerquery.training/course. This is one of the cool things that Miguel teaches there. Super useful!
Pingback: Excel Roundup 20151005 « Contextures Blog