I know this topic has been covered before, but I’m teaching a course on Power Pivot tomorrow, and it’s something that I’ll probably be brining up. As we need a calendar table for our Power Pivot solutions, a method to create a dynamic calendar table is pretty important. If you haven’t seen this before, I think you’ll be surprised at how easy it is to create a complete calendar driven by only a few Excel formulas and Power Query.
Setting up a Dynamic Source
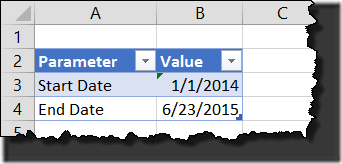
The first key we need to do is set up a parameter table in order to hold the start and end date. To do that, I’m creating a basic parameter table as described in this post. Mine looks like this:
- B3 is simply a hard coded January 1, 2014
- B4 contains the =TODAY() function, returning today’s date
Once I created this table, I named it “Parameters” (as described in the aforementioned blog post), then created the fnGetParameter function in Power Query (again, as described in the aforementioned blog post.)
With that work done, it was time to move on to creating my calendar.
How to Create a Dynamic Calendar Table in Power Query
What I did at this point was create a new blank Power Query:
- Power Query –> From Other Sources –> Blank Query
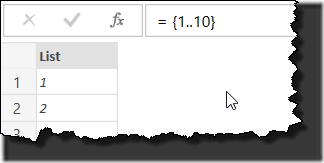
In the formula bar, I created a simple list by typing the following:
={1..10}
As you’ll see if you try this, it creates a simple list from 1 through 10. That’s great, but it’s just a temporary placeholder. Now I need to get my hands a bit dirty… I want to use the fnGetParameter function to load in my start and end dates as date serial numbers (not actual dates.) To do this, I’ll retrieve them and explicitly force them to be Numbers.
- Go to View –> Advanced Editor
- Insert two new lines as follows:
let
StartDate = Number.From(fnGetParameter("Start Date")),
EndDate = Number.From(fnGetParameter("End Date")),
Source = {1..10}
in
Source
So, as you can see, we’ve used the fnGetParameter function to retrieve the Start Date and End Date values from the Excel table, then converted them to the date serial numbers (values) by using Number.From.
With that in place, we can then sub the StartDate and EndDate variables into the list that we created in the Source step:
let
StartDate = Number.From(fnGetParameter("Start Date")),
EndDate = Number.From(fnGetParameter("End Date")),
Source = {StartDate..EndDate}
in
Source
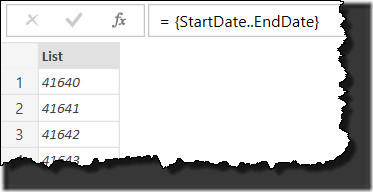
And when we click OK, we now have a nice list of numbers that spans from the first date serial number to the last from the Excel table:
“Great,” you’re thinking, “but I really want dates, not the date serial numbers.” No problem, let's do that.
First we need to convert our list to a table:
- Go to Transform –> Convert to Table –> Click OK (with the default options)
- Select Column1 –> Transform –> Data Type –> Date
- Right click Column1 –> Rename –> Date
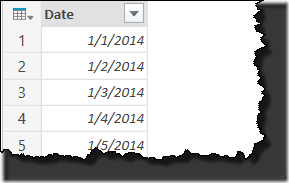
And look at that!
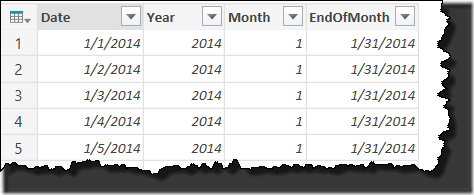
And now it’s just a matter of adding the different date columns we need. If you select the Date column, you’ll find a great variety of formats available under Add Column –> Date. Just browse into the subcategory you want (year, month, day, week) and choose the piece you want to add. In the table below, I added:
- Date –> Year –> Year
- Date –> Month –> Month
- Date –> Month –> End of Month
There are a lot of transformations for a variety of dates built in… for numeric or date values. One thing that’s missing, though, is text versions. For those you need to add a custom column. Here’s 3 formulas that you may find useful if you want to add text dates to your table:
- Date.ToText([Date],"ddd")
- Date.ToText([Date],"MMM")
- Date.ToText([Date],"MMMM dd, yyyy")
To use them, go to Add Column –> Add Custom Column and provide those as the formula. Their results add a bit more useful data to our query:
As you can see, they work like Excel’s TEXT function, except that the characters are case sensitive.
Conclusion
Overall, it’s super easy to create a dynamic calendar table using Power Query to read the start and end date from Excel cells. This makes it very easy to scope your calendar to only have the date range you need, and also gives you the ability to quick add columns on the fly for formats that you discover you need, rather than importing a massive calendar with a ton of formats that you will never use.
In addition to being easy, it’s also lightening quick if you’re prepared. It takes seconds to create the Excel parameter table, a few more seconds to set up the fnGetParameter function (if you have the code stored in a text file/bookmarked), and only a little while longer to create the original list and plumb in the variables once you’re used to it. I can knock up a calendar like this in less than two minutes, and let it serve my data model every after. 🙂
Power Query Training
I should also mention that this is one of the techniques (amongst MANY others) that we cover in our Power Query Academy.




8 thoughts on “Create a Dynamic Calendar Table”
Hi Ken,
Wow, this is so much more elegant than the “List.Datetimes” version – great!
You could actually skip the function here – this step would return the number of the start date:
= Number.From(Excel.CurrentWorkbook(){[Name="Parameters"]}[Content]{0}[Value])
{0} being the first row of column “Value” , so {1} would return the EndDate in your example.
This technique is also useful for filtering FactTables. I mean expression like this:
Number.From(FactTable[Date])>=Number.From(StartDate) and Number.From(FactTable[Date])<=Number.From(EndDate)
Inside Selection line.
I’d rather prefer to omit Date and Date/Hour format which is not as obvious and user friendly as it is in Excel.
Funny thing is that I wanted to write to you an email about this a couple of days ago… and you yourself start the topic.
Regards
Cezar
Hi Imke,
For sure, you could definitely do that. I tend to use the parameter table approach though, as I find it super easy to just drop in and go. I don't even need to think about what it takes to go direct. In addition, it gives me the ability to easily add other parameters on the fly as well. 🙂
Cezar, I'm curious to explore this one a bit more with you offline. I'll pop you an email. 🙂
Thanks. This was a great refresher on what I had learned about setting parameters (from the PQ training session). Using the list in PQ editor to create a dynamic calendar table was bloody awesome, too. Enjoy learning from your blog postings, Ken. I like the opportunity to work hands-on, following your path to a PQ solution. It's great stuff!!
Pingback: Using DAX Magic For Variable Forecasting - PowerPivotPro
Pingback: Power Query – Dynamic Date Table – Feathers Analytics
Pingback: Creating a custom calendar in Power Query