I got a question on the blog recently about creating a banding function in Power Query, or creating buckets for Accounts Receivable transactions (30-60 days, 60-90 days, etc.). As this is something that can be applied to a lot of areas, I thought it might make a good post to cover.
If you'd like a copy of the sample workbook, you can find that here.
The need for a Banding function
Picture that you have a list of transactions that could be from 1 – 170 days overdue, and you'd like to group them as follows:
- 0-30 days (current)
- 31-60 days
- 61-90 days
- 91-120 days
- >120 days
You could create a table with 365 days in column 1 and the appropriate description in column 2, then merge them, but that seems like a lot of work. It would be much easier to create a simple little function that banded them correctly for us. Especially if you happen to have a little template that you can refer to…
The Banding Function
The banding function template we need is shown below:
Notice the key parts here:
- days (highlighted in yellow) is the variable that we'll pass into our function to evaluate
- ARBand is the name of our function
- Between the indented curly braces we have a list of the potential outcomes we'd like to use for our bands. If the value of x (which we will test) is less than 31, it is labelled "Current". If not, then -- if it's less than 61 -- it is labelled "30-60 Days" and so on. The final clause (=>true) basically returns an "else" statement.
- The Result line then checks the days variable against the list and returns the correct match or the "else" clause if no match is found (">120 Days" in our case)
This banding function is a super useful template that you can modify to suit for any grouping needs. If you are updating this function for your own scenario, make sure that the yellow pieces match, the orange pieces match, then change the number bands and offsetting text pairs (ensuring that the remain wrapped in quotes).
You can add as many steps (bands) as you need, just make sure that each line ends with a comma, and the =>true line stays at the end of the list.
To implement the function:
- Create a new query –> from blank query
- Enter the Advanced Editor
- Paste in the code shown above
- Modify your bands to suit
- Click OK to exit the advanced editor
- Name the function
I obviously didn't need to edit mine, and I called mine "DayBanding".
Setting Up the Data
There are two pieces that I need to deal with for my scenario. I have a transactions table, but it only lists the original transaction dates. In order to work out the day bands, I need to create a way to show how many days have been elapsed. Easy enough to do, I just need to pull in today's date from somewhere.
So I created a simple table that holds today's date. (It's hard coded in the same file, since the transaction dates are hard coded as well.) Regardless, it looks like this.
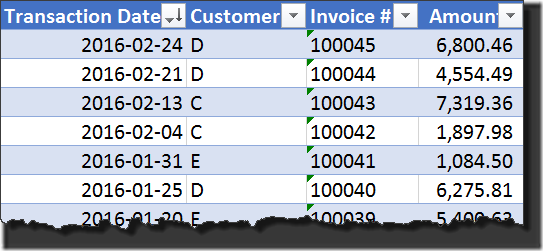
And here is an excerpt from the table of transactions:
Grabbing Today's Date
Since I'm going to need the date to work out the number of days outstanding, I'll start there. The steps to accomplish this:
- Select a cell in the parameter table –> New Query –> From Table
- Rename the query to "Today"
- Click the fx icon in the formula bar
- Modify the formula to show as follows:
- = Date.From(#"Changed Type"[Value]{0})
(I've discussed this technique a lot on the blog in the past – like in this post – but it basically we are drilling in to the first item in the [Value] column of that table, then wrapping the item with the Date.From() function to extract the date. We'll use this shortly, but first…
- Go to home –> Close & Load To… –> Only create connection
And we now have a way to pull up the date when need.
Grabbing the Transactions Table
Next I needed to pull in the ARTransactions table, include the date, work out the number of days outstanding, then band it all. Here's the steps I used:
- Select a cell in the ARTransactions table –> New Query –> From Table
- Add a Custom Column
- Name: Today
- Formula: =Today
This works since we called our original function Today, and we drilled right in to the date.
Next up, I needed to subtract the Transaction Date from Today's Date:
- Select the Today's Date column
- Hold down CTRL and select the Transaction Date column
- Go to Add Column –> Date –> Subtract Days
Using the Banding function
The final step is to call the banding function and classify our days:
- Add Column –> Custom Column
- Name: Day OS
- Formula: =DayBanding([DateDifference])
- Right click the Today's Date column –> remove
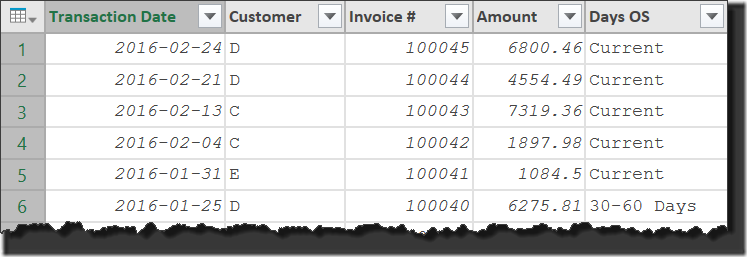
And we have a nice table that has the grouping level we need:
Another little trick…
Now I'd like to build a PivotTable using this, but I'm not really in love with the idea that I have to load this data to a table first. I mean really, I only added a single column. Normally I'd load this to the data model, but I don't really need Power Pivot for what I want to do. So let's take a look at another little trick that will let us avoid the data duplication that would be caused by loading this to either the Data Model or the worksheet.
- Close & Load To… –> Only Create Connection
Now we need to build the PivotTable. I'm going to show the steps for this in Excel 2016 (because I'm working on a computer that only has Excel 2016), but you should be able to make this work in Excel 2010/2013 as well.
- Insert –> Pivot Table
- Choose External Data Source (yes, you read that right) –> Choose Connection
In this window, your queries should show up!
- Select the Query – ARTransactions –> Open
- Choose to place your Pivot Table wherever you'd like it –> OK
Configure the PivotTable as follows:
- Rows: Customer
- Columns: Days OS
- Values: Amount
And with a couple of sorting and formatting changes, I've got this thing of beauty:
Final Thoughts
I showed a couple of tricks here: How to use a banding function, and how to build a PivotTable directly against a connection only query without having to go through Power Pivot. Both useful things that you should have in your arsenal of tools. ![]()


20 thoughts on “Creating a Banding function in Power Query”
Why {(x)=>x<61, "31-60 Days"}
Nice trick anyway
Ken, this is awesome & overdue 🙂
Yet, we could even add a little more magic to it by passing in the banding values as a table. Would let the users change the banding values without editing the code: https://www.dropbox.com/s/201rwpll3lye2ud/Ken_BandingTable.xlsx?dl=0
Stay queryious 🙂
Very useful case! Thanks, Ken.
The Table.Partition() function is also useful for this kind of thing: http://blog.crossjoin.co.uk/2014/10/07/creating-histograms-with-power-query/
The pivot external connection is excellent! Are there any downsides to using this technique in Excel 2010?
As for the hard-coded function, or even Imke's text function construction, I prefer to use a function which compares the outstanding days with the bands in a more brute-force table column math manner - this might be more generally applicable to non AR type cases.
I'm not aware of any downsides yet, no.
Very true, Imke. 🙂
Chris, that is really cool!
Sergey,
It's the syntax of the function. The evaluation line (after the list), scans the list in order for a comparison. Assuming the number was 45, then it would not have met the first band, so moves on to the second. Since it's less than 61, it returns the "31-60 Days" band. (It's greater than or equal to 31, and less than 61.)
Hope that helps,
Ken, I understand how it works. I mean it should look like this
{(x)=>xxxxtrue, ">120 Days"}
or like this
{(x)=>xxxxtrue, ">120 Days"}
shouldn't it?
What a fun?.. Looks like parser cuts or evaluates some parts of code =(
I just tried to insert your example with some modifications.
It should look like this
x less 31, Current
x less 61, 31-60 Days
...
or like this
x less 30, Current
x less 61, 30-60 Days
...
shouldn't it?
Hey Sergey,
I read it this way...
If the value is greater than the previous step and less than... (31, 61, 121) then do this. In the final step it's basically "if the values is greater than the previous step"
Pingback: Excel Roundup 20160307 « Contextures Blog
This is a break down example of the banding function.
let
days = 45,
ARBand =
{
{(x) => x x x x true, ">120 Days"}
},
BandsLessThanDays = List.Select(ARBand, each _{0}(days)),
firstBand = List.First(BandsLessThanDays),
Result = firstBand{1}
in
Result
Ken, I think Sergy is saying you have a typo in the screen grab for the Banding function. It says 30-60 Days, and should say 31-60, as it does at the top of the post where the bands are listed. See your response to Sergy - you put 31-60 in there, but not in the actual code.
Cheers
Ohh... gotcha! Yes, the screen shot of the code is incorrect. (Sorry, I wasn't following that.)
I think I'm going to leave it as is, only because I've referred to the 30-60 in both images and titles. But yes, it should be 31-60 everywhere.
Ken, this banding function is exactly what I needed. I like that it is flexible - will be able to use for many similar models.
This is great thanks. How do I create a band for NULL values. I tried {(x)=null,"Unknown"},
but that didn't seem to work
I'd probably approach this by changing the result line as follows, since the function expects numbers:
Result = if days = null then null else List.First(List.Select(ARBand, each _{0}(days))){1}
That will test if the original input is null and return null if so, or return the number if the days column had a value.
Perfect - thank you very much Ken. This has worked really well on my creation of age groups.