You know the drill… extract, transform and load your data, relate your tables, then create basic DAX measures. All work that needs to be done before you can really get started on analyzing your data. Today we’ve unleashed the Measure Monkey to help speed up that process a bit for you. (You can think of the Measure Monkey as Quick Measures for Excel.)

If you follow Monkey Tools already, you’ll know that our goal is to help you build better models faster. We already include helpful functions such as:
- the ability to inject a query that can automatically switch between local folders and SharePoint folders
- manage your queries via our Query Sleuth
- build calendar tables on the fly against your data
- and so much more...
But while we’ve had a nice tool to trace DAX query chains, we haven’t included a lot of DAX functionality to date. That is changing today. And oh… before we dive into it, I want to be clear that this feature will be available to ALL users of Monkey Tools. Yes, even those of you using a Free license!
The Sample Model
Before we dive into this, let’s take a look at a sample data model:
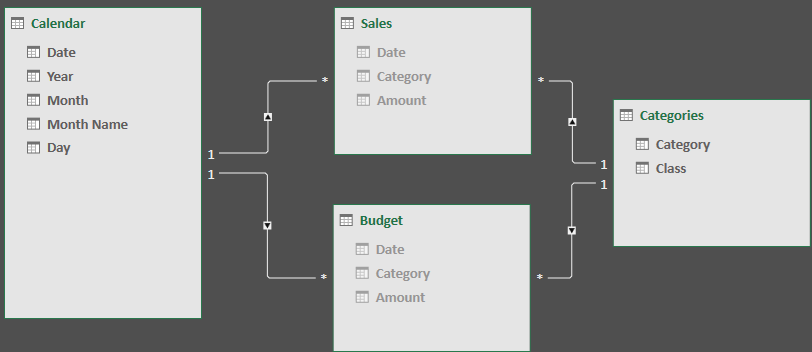
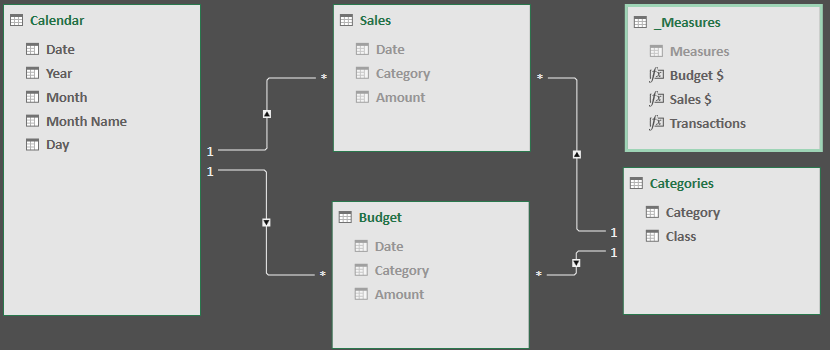
Notice that everything is nicely created and linked (by the way - we created that calendar in a few seconds with Monkey Tools’ Calendar Monkey…) but that there are no DAX Measures on our Sales and Budget tables. Date and Category are both foreign keys that link each of the those tables to the Calendar and Categories tables. However, we really want explicit measures to sum both the Sales[Amount] and Budget[Amount] columns.
Of course, these measures are easy to write, but what if your model is a bit more complicated and there are ton of them to do?
Creating Explicit Measures in Bulk with the Measure Monkey
As of version 1.0.7599.31348, you’ll find a new Measure Monkey menu on the Monkey Tools ribbon for this exact purpose:

Step 1A: Which Tables Host The Columns To Aggregate?
When you launch the new feature, you’ll be taken to a screen that looks like this:
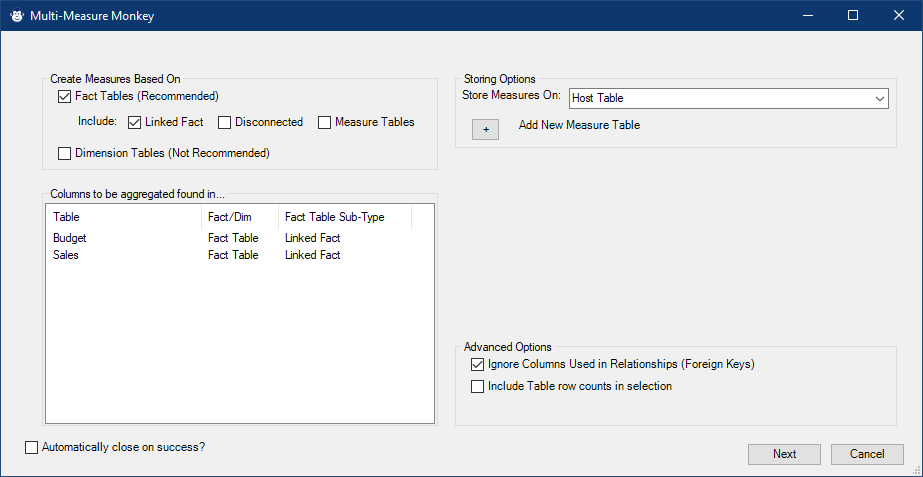
This screen in intended to allow you to tell the Measure Monkey which tables hold the columns you need to aggregate. Our aim in this screen is to give you the highest possible chance of just clicking "Next". That being said, we realize that this may not work for everyone, so we also allow some flexibility here.
In the top left, we pre-select the tables which we believe have the highest chance of needing aggregation: your fact tables. (Those tables with only ‘many’ sides of relationships attached to them.) But if we get this wrong for you, you simply need to check the other boxes to include basic aggregations for other tables. (Ideally, you shouldn’t be aggregating dimensions, but there are – of course – exceptions to every rule.) You’ll get immediate feedback in the box in the bottom left, as we show all the tables that will be included based on your checkbox selections.
Step 1B: Tell the Measure Monkey Where to Store Your New Measures
In the top right, we also allow you to tell us where you want to store the measures. If you have created a specific “Measures” table, we’ll provide that by default. If you haven’t, we’ll offer to store the measures on the Host Table. (In other words, all measures created to aggregate columns from the Budget table will be stored on that table, whereas columns from Sales will be stored on Sales.)
Forgot to set up a new Measures table before doing this? No worries, click the + to add a measures table on the fly, give it a name, and we’ll create it for you:

There are a couple of Advanced options as well, but we believe most people will want to leave these set based on their defaults. So let’s click Next, to go to page 2…
Step 2: Choose Your Aggregations
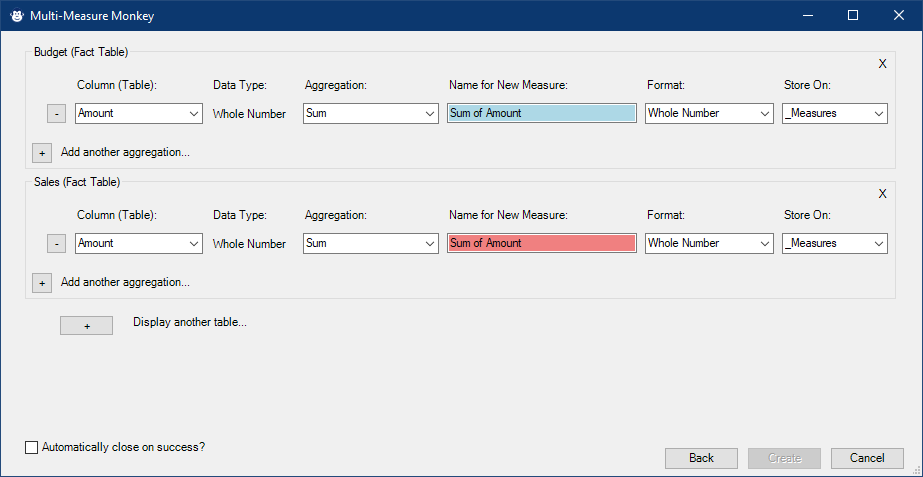
This page contains a ton of info, but again we’re trying to provide you the biggest chance of clicking “Create” right away. Unfortunately, this is something that we can’t do in the image above…
The reason our Create button is disabled is that we have two measures offered with the name “Sum of Amount”. The blue one is the first instance, and any subsequent measures with the same name will highlight in red. So let’s fix those, and choose a default data type format:
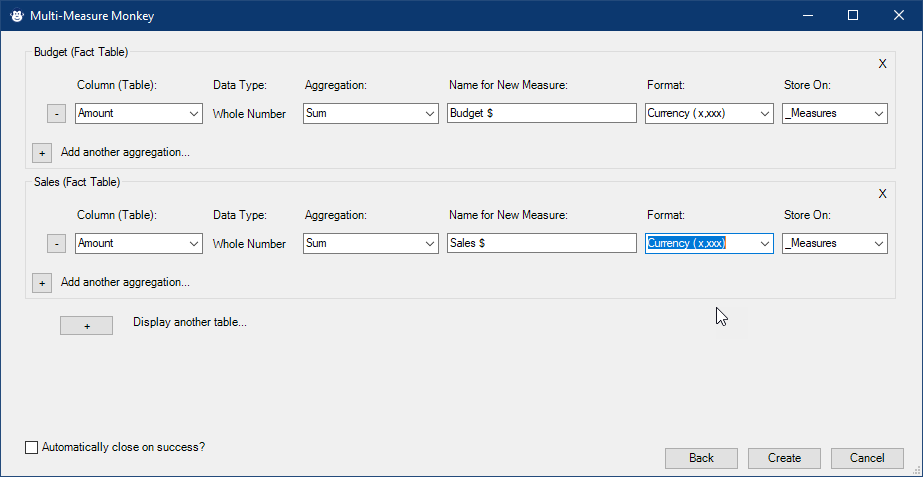
It’s all good to go now, except that I want to add a “Transactions” measure that counts the rows of the Sales table. So I’m going to click the “Add another aggregation” button in the Sales table. Then I choose the name of the table from the drop down list:
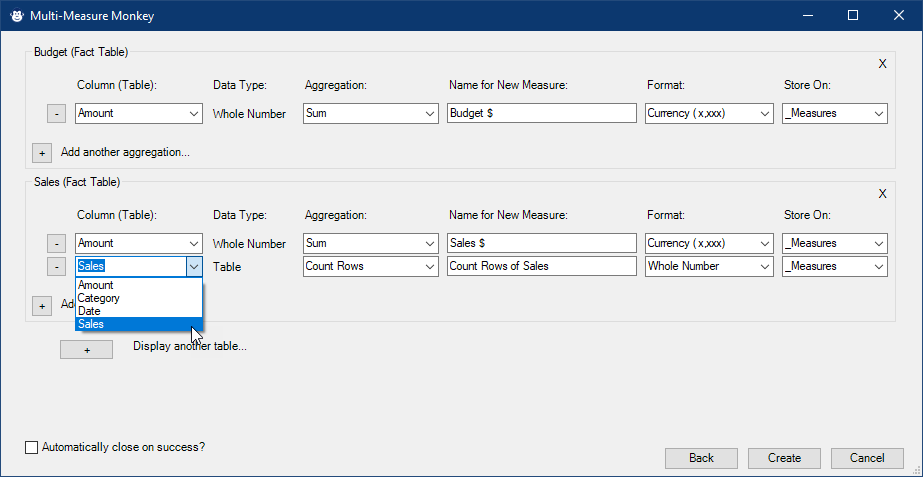
That will give me a new row with a “Count Rows of Sales” measure, which I can quickly rename to “Transactions” before clicking “Create”.
During this process, the Measure Monkey will create your measures for you. Plus, if you created a Measures table, it gives you some advice on how to make it an “official” measures table. You can see the results in my data model here:
That was Easy…
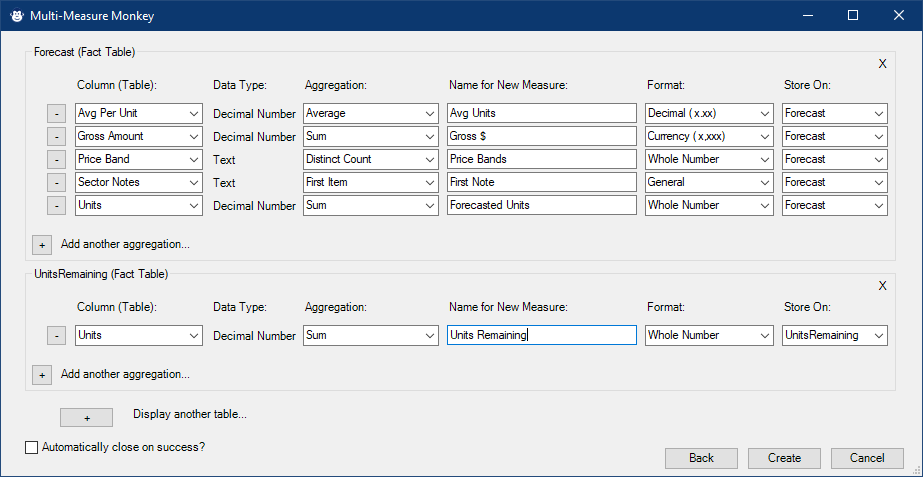
The demo above was obviously a fairly simple model. Yet it cuts my explicit measure creation time down to less than a minute to create these two measures. Now consider the time savings when you get a bit more complicated:
So how do you get the Measure Monkey menu?
This update to Monkey Tools is available in Monkey Tools 1.0.7599.31348 or higher. And it's will be a “forever free” feature, so you’ll be able to use it on either a Free or Pro license!
To try our free trial, head over to the Monkey Tools product page to download your copy.
If you already have Monkey Tools installed, it will automatically update within a couple of weeks. Alternatively, you can request the update now by going to Monkey Tools -> Options -> Check For Update Now…
2 thoughts on “Introducing the Measure Monkey”
Very Neat - thanks
Ken - this looks like a great tool, thanks for developing and sharing!