In Introduction to the Excel WebApp, we learned how to create, upload and view files in Microsoft's Web Version of Excel, hosted on SkyDrive (a free offering from Windows Live.)
It should be noted that thee main reason for creating a file in the Excel WebApp is to share it with others. So now that we’ve learned how to create and upload documents into our Windows Live SkyDrive account, let’s look at how to share them with our friends, co-workers and potentially anyone else in the world.
Before we can share any documents using the Microsoft Excel WebApp though, we need to create a folder in SkyDrive for that purpose.
Creating a Public Folder
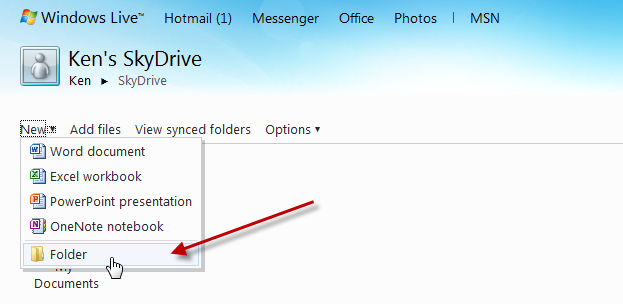
Log in to your Windows Live account, and navigate to your SkyDrive. Once you get there, create a new folder by clicking “New-->Folder”:

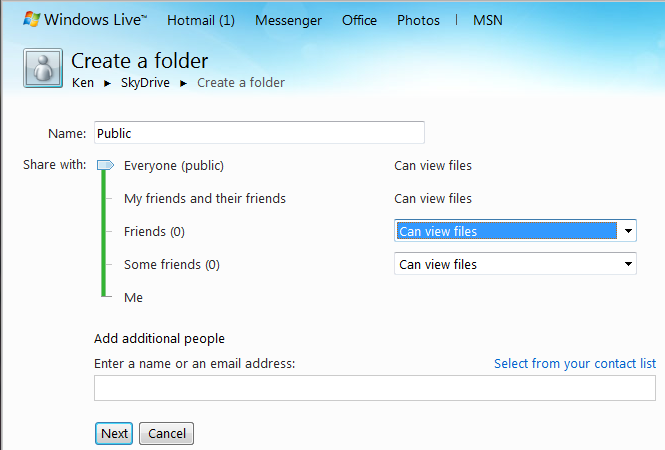
In the screen that pops up, give the folder a title. We’ll call this one “Public”, as we’ll allow anyone to see what’s in there, then click Next.
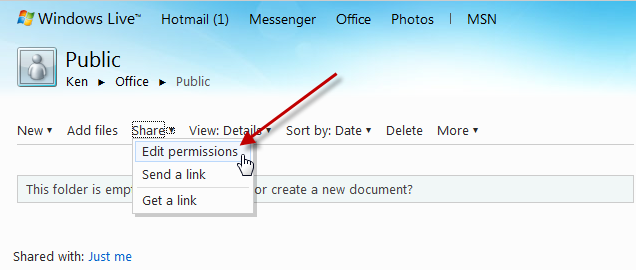
At this point, you’ll be in your new folder, but it is only shared with you. So let’s share it with other people. To do that, we need to click "Share --> Edit permissions". (We can return here to send a link once we’ve got our permissions set correctly.)

The next screen allows you to change the folder’s sharing permissions. Slide the indicator bar up to turn this into a publicly viewable folder.

Notice here that we can add additional permissions for people if we wanted. Our options are to have the folder set to:
- “Can view files”
- “Can add, edit details, and delete files”
Ideally it would be nice if we could give users the ability to view and edit existing files without the ability to add or delete them. Unfortunately this isn’t the case, but hopefully we’ll see it in future versions of Windows SkyDrive.
We can, however, set these permissions for groups of people, or even allow view access for everyone except a couple of special people we’ve selected from our contact list.
If you want to share a folder with only one or two people, simply slide the bar down to “Some Friends”, and add specific people. (Either select them from your contact list, per the link, or type their email address into the space provided.)
In this case, we’re going to stick with “Everyone (Public)”, so click “Save”.
Sharing the Folder
To share the folder with people we have a few options, all of which are contained under the Share menu:
- “Send a Link” allows you send a link to your folder via email
- “Get a link” allows you to retrieve a web address that you can email to others manually
- “Embed” allows you to embed the folder in a web page (we will cover embedding in a later article)
- “RSS feed” allows you to read when new content is published to the folder
Sharing Specific Files
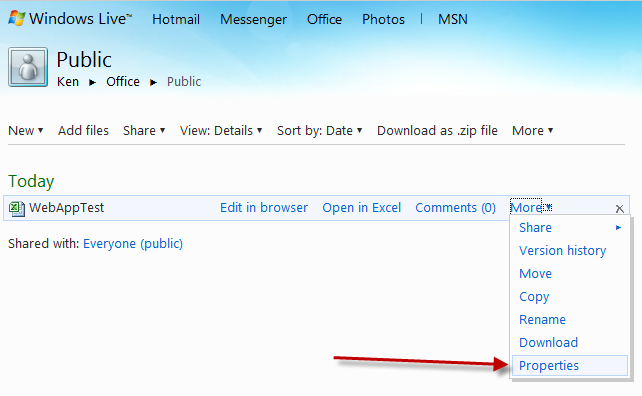
Create a new Excel file in your Public folder and call it WebAppTest. Put a bit of basic data in the file, just to prove that there is something there, then click the SkyDrive link at the top of the WebApp. You’ll be taken back to your Public folder. Now, mouse over the name of the file, and an option bar will appear.
Click "More-->Properties"

In the bottom right corner (under the advertising link) you’ll find a field call “Web address:” Contained in that field is a URL like this one:


One thought on “Sharing in the Microsoft Excel WebApp”
Pingback: Introduction to the Excel WebApp - Excelguru