A Little Background
My staff and spreadsheet users will tell you that any time I build a spreadsheet, there are always shaded cells on the grid. I preach that "Green means go", and make sure that any cell they enter data in has a green background. I also use blue backgrounds for "update these sometimes" cells, like tax rates. If cells are left with no colouring, though -- everyone here knows that they should be left alone.
The case I was working on today was a development report, of which I have a few data entry cells scattered throughout the overall file. You could argue that this violates a good design principle in that you should keep the data separate from the report, but in this case I'm comfortable with the design. I have shaded my input cells in green, and know that I'm not going to lose track of them.
The problem that I decided to address today was that the green backgrounds print. While they're great for telling the user where to input data manually, our Asset Manager isn't really interested in seeing that kind of info. In fact, it's distracting, so better left off. But how do you do that?
I could create a full new report that essentially duplicates what I've got, but then it's both a maintenance headache and performance hit. Not really where I want to go. Instead, I opted to use a conditional format to hide the colour on the cells when I go to print the sheet. This would have been really easy, if it weren't for the fact that I wanted to do it automatically. That involved dipping into some VBA. If you're not comfortable working with VBA though, read on anyway. You can still do the setup for this and control it manually.
I'll get into the steps I used to solve the issue in just a sec, but I wanted to say that, to me, this article illustrates three things:
- If you aren't aware of conditional formatting, you should be
- If you don't know VBA, you should learn it
- There should be a Workbook_AfterPrint event in VBA
Step 1: Setting up the Control Point
The first thing I decided to do was to create a cell to control what mode I'm in. i.e. Printing Mode or Working mode. There's lots of ways I could have done this, but since I have a worksheet dedicated to being a "Control Panel", I set it a cell on that worksheet to hold a "Yes" or "No" value:

As you can see, I use this approach to drive a few other things as well, such as dates for column headers, the type of data pulled from a PivotTable and more.)
Before someone asks why not True/False values, I opted to use Yes/No as it's more readable to others if they have to work with the spreadsheet.
Step 2: Name the Range
The next thing I did is assign a name to the PrintMode value. In this case, I assigned the name rngPrintMode to the cell B11 on my control panel worksheet. While this isn't truly required to make this work, I just find it much easier to work with the named range later, rather than try to remember the cell reference. It does become key when you move to the VBA side though. VBA doesn't update its reference to the cell when a line in inserted above, while the name range does. For this reason, I always used named ranges when referring to worksheet ranges in VBA.
Step 3: Set up the Conditional Format
The steps shown below are for Excel 2007, but with a little ingenuity, I believe you could make this work in 2003. I'm assuming that you already have a green (or other) background on your data entry cell at this point.
- Select the data entry cell(s) that you want to hide the colour on
-
On the Home Tabà Conditional Formattingà New Rule then create a formula as shown below:
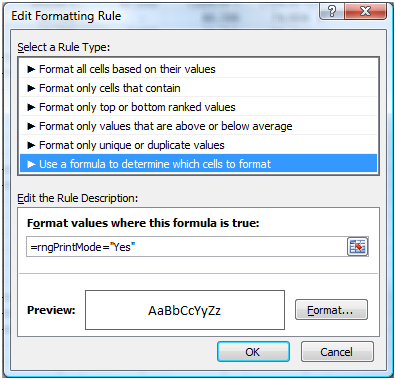
- Click Format
- From the "Fill" tab, click "No Color"
- Click OK twice
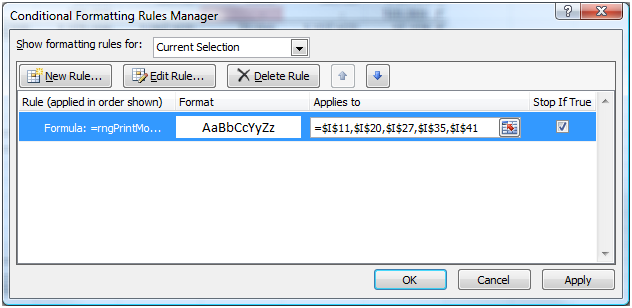
At this point, the conditional format has been set up. As an optional step, I actually also set the "Stop If True" option in 2007, as this allows me to use multiple conditional formats on the same section, yet ignore them all for printing. You won't find this in Excel 2003 though. (Also, if you want to stop all formats, make sure the rule is at the top of the list!)
As far as the setting up the conditional formatting, you're actually done. Change the value on the rngPrintMode cell to "Yes", and your conditional formats should kick in, removing any applied background colours. Now you can print without the data entry cells conspicuously marked! Change it back to "No", and the colours re-appear.
Just a hint here: if you want to leave this as a manual control, I'd suggest setting up a data validation list to control the field. Debra Dalgleish has a great article on doing that which you can find right here.
Step 4: Adding Automation
Personally, I don't do manual if I can help it. Maybe I'm pretty lazy, but I want this to automatically kick in when I hit print, and set itself back once it's done. So to do this, I added a couple of procedures to my project.
In a STANDARD MODULE, I added the following:
[vb]Public Sub PrintingActive(Optional bStatus = False)
'Date Created : 5/11/2009 10:48
'Author  : Ken Puls (www.excelguru.ca)
'Macro Purpose: Toggle the printing mode variable to control conditional format set

Dim rngInfo as Range

'!!! Set Your Worksheet Here !!!
Set rngInfo = Worksheets("Control Panel").Range("rngPrintMode")

'Check the status and set the cell accordingly
If bStatus = True Then
rngInfo.Value = "Yes"
Else
rngInfo.Value = "No"
End If

End Sub[/vb]
You'll need to change your worksheet name for the one that holds the named range you defined earlier. Just change "Control Panel" to "Your Worksheet Name".
Then, I went to the THISWORKBOOK module, and put the following in it:
[vb]Private Sub Workbook_BeforePrint(Cancel As Boolean)
'Date Created : 5/11/2009 10:34
'Author  : Ken Puls (www.excelguru.ca)
'Macro Purpose: Toggle the conditional formats for printing

Call PrintingActive(True)

Application.OnTime Now + TimeValue("00:00:01"), "PrintingActive"

End Sub[/vb]
At this point, providing you had things working manually in step 3, things should just work by hitting the print button. The BeforePrint routine will call the PrintingActive routine, which will flip the rngPrintMode variable to TRUE. This will in turn trigger the conditional format rule. The Application.OnTime then schedules a call of the PrintingActive routine to run in one second. The worksheet(s) are then printed.
The part that bugs me about this approach is that I have to rely on using OnTime, which kicks off a routine based on time, not necessarily when my existing routine completes. Theoretically, if I had a really huge print job, the call to PrintingActive could be triggered before my job is complete. In my tests that didn't happen, but if it does, just add a few seconds to the TimeValue. I.e. "00:00:15" will turn it into a 15 second delay.
The ideal solution would have been to leverage a Workbook_AfterPrint event, but sadly one does not exist.
Conclusion
For my needs, this works. I now just click the print button and all of my green cells change their backgrounds to white (transparent), the file prints, and then the colour(s) are reinstated. And it all happens without me having the change the cell value manually.
4 thoughts on “Trigger Conditional Formats Before Printing”
Funny, I'd have turned this around: leave cell background without fill and turn it green if printmode="no".
A good alternative is using styles and toggling the fillcolor of a style.
Good point on the styles. 🙂
With regards to the other, I've got so many files built that have cell fills in them with no dynamic ability. This is the first one where I decided to do it. So it was a building on an existing base. 😉
Instead of toggling, won't this work:
Private Sub Workbook_BeforePrint(Cancel As Boolean)
[rngPrintMode] = "True"
ActiveWindow.SelectedSheets.PrintOut Copies:=1, Collate:=True, _
IgnorePrintAreas:=False
[rngPrintMode] = "False"
Cancel = True
End Sub
Pingback: Trigger Conditional Formats Before Printing - Excelguru