So based on Johan's comment on yesterday's post about this being easy, I decided to give it a shot. So far, with the exception of a boneheaded move where I tossed a virtually complete post without saving it, I'm pretty impressed at how easy this seems. I'll know for sure if this appears live though.
For lack of better content to test with, I figured I'd give a step by step guide to setting this up. J Okay, seriously, it also shows how easy it really is, and gives me a good excuse to try all kinds of formatting, such as Styles, images, URL's, numbering, and smileys. 😉
So here we go!
Creating a Blog Post: Part I
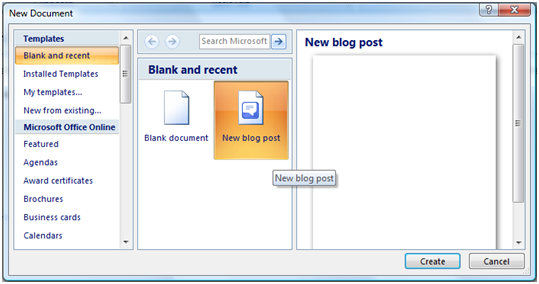
To start with, I simply went to the Office Menu, chose to start a New file, and chose Blog Post, then Create:
Registering Blog Credentials
At this point, I was greeted with a (hopefully) one time setup wizard to "Register My Blog". (Basically tell Word where my blog is, and what the login credentials are to publish content.) Here are the steps to making it happen.
-
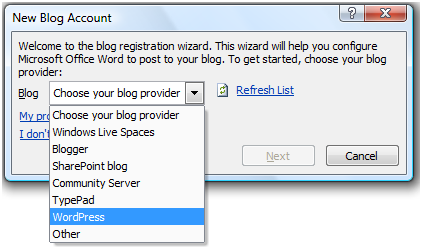
First, you need to choose your blog provider from the list shown below. Fortunately, WordPress was in the list, so I didn't need to create my own:
-
Next, you tell Word where your blog is located, and provide your login credentials in the box below:
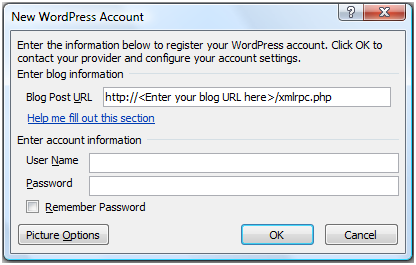
NOTE: I think the Word team did a good job with this by putting the <Enter your blog URL here> part, as it makes it really obvious where it goes. For me, this was pretty simple to complete, (https://excelguru.ca). Hopefully you'll know your login credentials for your own site. 😉
-
Just to be thorough, I also decided to check the Picture Options. I actually ended up going with the default of My Blog Provider, so we'll see if it works.
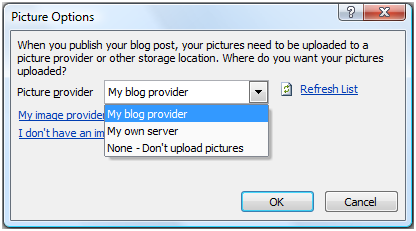
- Click OK a couple of times, and the blog registration is done.
Creating a Blog Post: Part II
Okay, so now that we're done with the setup intermission, I'm dumped into a blank Word document with the following:

Again, it was pretty obvious what to do!
- As you can imagine, I selected the text above, changed it to Blogging to WordPress from Microsoft Word.
- Finally I dropped below the line and started composing my post.
Adding a Category
Of course, we also have Categories in our blogs. In the UI, there is a place to select those, so I figured I might as well try that too. I clicked the Insert Category button.
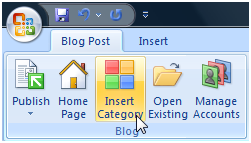
I had to clear a login box to the blog, and after that nothing seemed to happen. I clicked it again... still nothing. Again.. (Like anything was going to change, but I like to do stupid things like that sometimes.)
Finally, I scrolled back up to the top of the document... aha! It had inserted some fields for me to play with under the title!
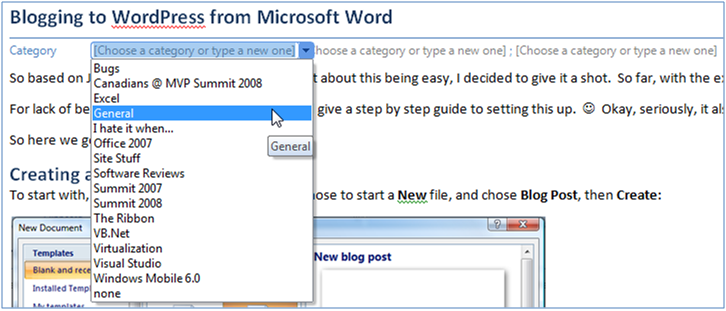
So I picked General, Software Reviews, and Office 2007. J
The End Result
All right, I'm not going to tell you what I typed, as you can already see that. (Remember that I'm still writing, so I don't even know if this will make it to the blog, although I have some faith it will!)
What I am going to do is quickly summarize the stuff that I believe is important in this post, to see how it comes through. This is partly notes to me, so I know what the original Word document looked like before I posted it, as well as notes to anyone else who is interested:
| Paragraph / Line beginning | Items of importance | Why it's important |
| For lack of better... | Contains a happy face, and a winking icon that translate into smileys in WordPress. | First, I want to see if it interprets smiley faces. Second, the happy face (colon + closing parenthesis) already converted to a happy face in Word, while the winking still shows here as a semi-colon and a closing parenthesis before publishing. (Actually, you can see the smiley in the category image just above.) |
| Creating a Blog Post: Part I | Done in the Heading 1 style | How are heading styles implemented? |
| To start with... | Contains words formatted in bold, and is followed by an image | How does bold formatting implement, and how are images in Word dealt with? |
| First, you need to... | Contains numbering | How is numbering implemented? |
| At this point... | Contains "smart quotes", not plain old regular ones | These were apparently an issue in Word Beta2, so I want to see if they were truly fixed. |
| NOTE: I think... | NOTE is in red, the entire line is in italics, it contains a URL, and a smiley set (in italics this time though.) It also contains the "greater than" and "less than" signs around the "Enter your blog URL here" phrase. | The greater than and less than characters can be problematic, as they are typically characters that indicate code, particularly in XML. I'm also curious to see how more complex (overlapping) formatting works. |
| "Enter Post Title Here" picture | Has a border around it in Word. | The rest of the pictures were snapped (by the world's best screen capture program; SnagIt), and pasted into Word. This is the only picture that was changed by adding a border to it. |
| As you can imagine... | This line, as well as the following one, are bullet points. In addition, the Blogging to... title was underlined. | The underline was just to check formatting. I was more interested in seeing how the bullets would be implemented. |
| This whole table | Is a table | How are tables implemented? |
And there you go! I'm going to hit Publish now, and see what happens!


4 thoughts on “Blogging to WordPress from Microsoft Word”
Well, well. I'm suitably impressed! It looks like the only thing that didn't come through quite right was the happy face icon. Those got converted to the J character, which actually doesn't surprise me that much. I often seem to get J characters in emails that have been sent to me from Outlook.
So, despite being really painfully long winded, this was really easy. Easier, in fact, than logging on to WordPress to make the post!
Ken,
This is interesting as Word usually helps me to track the most obvious misspelling when I in English 🙂
I will try it myself to see the outcome.
Thanks!
Dennis
Hi Ken,
It's a nice little feature, there was a addin for blogger which would do the same, and most of the on-line office app allow it now to.
Do you think you will do it this way form now on?
Hi guys,
Dennis, I agree, although in fairness, Firefox checked my spelling for me as well. 🙂
Ross, I'm thinking that I probably will. It feels so much easier to write in the rich client than the web interface. The page is bigger, the formatting tools much more accessible, and it overall just feels more satisfying.
One of the technical things that is really nice about this is that, if something went wrong in WordPress editing, I'd often have to go to the HTML view to sort it out. On long posts, that could be a real pain. Word makes it really easy, as it converts the formatting once. (Less room to get confused.)
As Johan mentioned, the scaling of images is way easier as well. 😉