I’ve run into this issue in the past, and also got an email about this issue this past week as well, so I figured it’s worth taking a look. Power Query takes certain liberties when importing a file, assuming it knows what type of file it is. The problem is that sometimes this doesn’t work as expected, and you need to be able to force Power Query to import as a text file, not the file format that Power Query assumes you have.
IT standards are generally a beautiful thing, especially in programming, as you can rely on them, knowing that certain rules will always be followed. CSV files are a prime example of this, and we should be able to assume that any CSV file will contain a list of Comma Separated Values, one record per line, followed by a new line character. Awesome… until some bright spark decides to inject a line or two of information above the CSV contents which doesn’t contain any commas. (If you do that, please stop. It is NOT A GOOD IDEA.)
The Issue in the Real World
If you’d like to follow along, you can click here to download MalformedCSV.csv (the sample file).
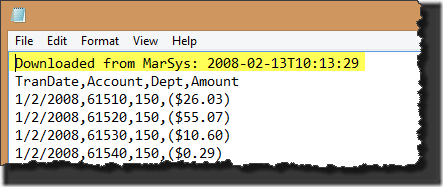
If you open the sample file in Notepad, you’ll see that it contains the following rows:
Notice the first row… that’s where our issue is. There are no commas. Yet when you look at the data in the rows below, they are plainly separated by commas. Well yay, so what, right? Who cares about the guts of a CSV file? The answer is “you” if you ever get one that is built like this…
Let’s try importing the sample file into Power Query:
- Power Query –> From File –> From CSV
- Browse to MalformedCSV.csv
And the result is as follows:
One header, and lots of errors. Not so good!
The Source Of The Error
If I click the white space beside one of those errors, I get this:
What the heck does that even mean?
Remember that CSV is a standard. Every comma indicates a column break, every carriage return a new line. And we also know that every CSV file has a consistent number of columns (and therefore commas) on every row. That’s why you’ll see records in some CSV’s that read ,, – because there isn’t anything for that record, but we still need the same number of commas to denote the columns.
And now some joker builds us a file masquerading as a CSV that really isn’t. In this case:
- Our first row has no commas before the line feed. We therefore must have a one column table. Power Query sets us up for a one column table.
- But our second row has three commas, which means three columns… That’s not the same number of columns as our header row, so Power Query freaks out and throws an error for every subsequent record.
So Now What?
If we can’t rely on the file format being correct, why don’t we just import it as a text file? That would allow us to bring all the rows in, remove the first one, then split by commas. That sounds like a good plan. Let’s do it.
- Power Query –> From File –> From Text
- Browse to the folder that holds MalformedCSV.csv
Uh oh… our file is not showing. Ah… we’re filtered to only show *.txt and *.prn files…
- Click the file filter list in the bottom right and change “Text File (*.txt;*.prn)” to “All Files (*.*)”
- Open MalformedCSV.csv
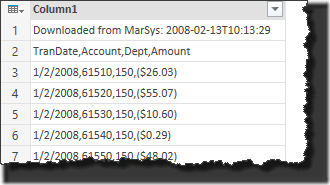
And the result…
Damn. See, Power Query is too smart. It looks at the file and says, “Hey! That’s not a text file, it’s a CSV file!” and then imports it as a CSV file... which we already know has issues. Grr…
Force Power Query to Import as a Text File
Let’s try this again, this time from scratch. We need two things here…
- The full file path to the file you want to import (including the file extension). On my system it is "D:\Test\MalformedCSV.csv"
- A little bit of a code template, which is conveniently included below.
What we’re going to do is this:
- Go to Power Query –> From Other Sources –> Blank Query
- View –> Advanced Editor
- Paste in the following code
let
/* Get the raw line by line contents of the file, preventing PQ from interpreting it */
fnRawFileContents = (fullpath as text) as table =>
let
Value = Table.FromList(Lines.FromBinary(File.Contents(fullpath)),Splitter.SplitByNothing())
in Value,

/* Use function to load file contents */
Source = fnRawFileContents("D:\Test\MalformedCSV.csv")

in
Source
- Update the file path in the “Source” step to the path to your file.
- Click Done
And the output is remarkably different… in fact, it’s the entire contents of the file!
This is awesome, as we now have the ability to clean up our data and use it as we were hoping to do from the beginning! So let’s do just that…starting with killing off that first line that’s been screwing us up:
- Home –> Remove Rows –> Remove Top Rows –> 1
- Transform –> Split Column By Delimiter –> Comma –> At each occurrence of the delimiter
- Transform –> User First Row As Headers
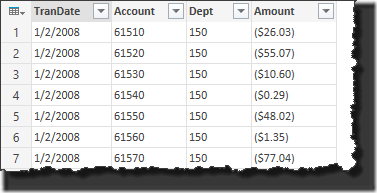
And now we’ve got a pretty nice table of data that actually looks like our CSV file:
The final steps to wrap this up would essentially be
- set our data types,
- name the query, and
- load the query to the final destination.
Final Thoughts
This seems too hard. I know that Power Query is designed for ease of use, and to that end it’s great that it can and does make assumptions about your file. Most of the time it gets it exactly right and there is no issue. But when things do go wrong it's really hard to get back to a raw import format so that we can take control.
I really think there should be an easy and discoverable way to do a raw import of data without making import/formatting assumptions. A button for “Raw Text Import” would be a useful addition for those scenarios where stuff goes wrong and needs a careful hand.
I should also mention that this function will work on TXT files or PRN files as well. In fact, it also works on Excel files to some degree, although the results aren’t exactly useful!
The key here is, whether caused by one of more extra header lines in a CSV file, tab delimited, colon delimited or any other kind of delimited file, the small function template above will help you get past that dreaded message that reads “DataFormat.Error: There were more columns in the result than expected.”
Addendum To This Post
Miguel Escobar has recorded a nice video of the way to do this without using any code. You can find that here:


21 thoughts on “Force Power Query to Import as a Text File”
I hope they improve this. It would be awesome to remove the first row then import per-normal as CSV... so that you can correctly handle comma's that are embedded in strings and such. 🙁
Maybe an advanced option to start the import at row x or something. That would be super handy. 🙂
TX for this handy tip Ken.
I am skilled in Excel, but a complete novice with the Power Tools and I've been "playing" with Power Query here and there. On one such instance I was trying to import a simple text file and I was hitting brick walls with the import where the same text file was a breeze to import into Excel (with the text import wizard). It did make me think why a tool for manipulating data had no such "wizard" to conveniently import data. If it is to be used to cleanse data it should be able to handle "dirty/unstructured" data...?? I agree with your sentiments that a “Raw Text Import” should be made available.
Another think about this issue was that the option for "Treat consecutive delimiters as one" should be made available too. The text import eventually imported but the info was all out of sync due to the tabbed nature of the data - names longer and shorter cause other data to not line up.
I am all for the convenience of artificial intelligence, but there should really be a manual override if things cannot be catered for.
TX as always for your blog and valued advice.
Cheers
Hey Rudi!
There is such wizard 🙂 / please check the follow up to this blog post here: http://youtu.be/RjN7Cchpwvw
hope you find it useful!
Note to self... click on the gear icon to see what's in there... (Nice video!)
TX Miguel,
That is a great tip (thank you)! It is very hidden (IMHO) and I think it should have been an optional button in the Import menus on the ribbon. In addition to your tip to convert the CSV into text which allows the data to appear in the query window, it would be nice to have the consecutive delimiter option too.... (but now I'm just venting !). One step at a time 🙂
Cheers guys.
I am learning so much from the blog and the responses from everyone.
(TX for your email Ken)
Perfect article!
How about scenario when I have multiple CSVs in a folder but I dont want to use "Import from folder" option because I want to use this raw text workaround? Any tips?
Thx!
Once you've built the original query for one workbook, you need to turn it into a function. Once that is done, then you start a new query using import from folder, then call your function for each file in the list. What you're looking to do is actually covered in detail in day 2 of our http://powerquery.training/course if you're interested. 🙂
You might try this code in the Advanced Editor to combine multiple CSVs in a folder without using a function:
let
Source = Folder.Files("D:\Test"),
#"CombinedBinaries" = Binary.Combine(Source[Content]),
#"ImportedText" = Lines.FromText(Text.FromBinary(CombinedBinaries)),
#"TableFromList" = Table.FromList(ImportedText, Splitter.SplitTextByDelimiter("#(tab)"), null, null, ExtraValues.Error),
#"Removed Top Rows" = Table.Skip(TableFromList,1)
in
#"Removed Top Rows"
I was able to do this using the UI.
Starting from Import from folder, click the button by "content" to expand the Binary files. Delete the Changed Type and Imported CSV step, then use the "Open File As" button to import as a text file. Finally, use the normal split column tab to seal the deal!
Cheers
Marcus
Hi Ken,
Great solutions, as usual, thanks for sharing.
Just for your reference, because feedback is esential, if the file name comes from a table parameter like:
Fname= Excel.CurrentWorkbook(){[Name="FilePath152"]}[Content]{0}[Processed File 152]
Source= Csv.Document(File.Contents(FName),[Delimiter=",", Encoding=65001]),
in this case the gear icon to open the Source settings is not available anymore, and your version is the only way out 🙂
Cheers,
Catalin Bombea.
Very true. The only comment I think I'd make on this one, though, is that generally I connect to the file and run a full transformation before I go back an parameterize it. So in this case I'd still see and use the gear icon in order to generate the correct M code to start with. 🙂
Absolutely agree, this is the best way to work 🙂
Hi,
I'm new to PowerQuery/M so I may be missing something, but I managed to achieve the same effect by changing the Advanced Editor to:
Source = Csv.Document(File.Contents("C:\MyCSV.csv"),[Delimiter=",", Columns=32, Encoding=1252, QuoteStyle=QuoteStyle.Csv]),
FilteredSource = Table.Skip(Source,1),
#"Promoted Headers" = Table.PromoteHeaders(FilteredSource),
Hey Ian,
Glad you got a solution to work for this. One thing I'd just put forward here... This post is almost two years old now, and there have been several improvements to the editor since it was written. While the method I showed will still work, it may be rendered unnecessary in many instances by the updates made. (Which is a VERY good thing in this case!) 🙂
Ken, this is old, but great. This works on a single file located in a folder. Can this be adapted to import multiple files in a folder, all line by line, and appended with the filename?
Hi Don,
Yes it could... the easiest way would be to build a custom function to do it once you've tested it on a single file. We cover how to do this near the end of our book "M is for Data Monkey", and in the advanced portion of our Power Query Academy (https://powerquery.training/academy)
Pingback: Flat Files in Power Query - Adatis
Hi, thanks i used it and this works fine with me. Have always issues with csv files :/
Pingback: Treat Consecutive Delimiters as One in Power Query
Great explanation and code
Many Thanks